
 Yesterday’s easy lemon curd was always destined for one of my favourite desserts – tarte au citron – although I’ll admit it was very difficult to NOT just eat the lot out of the bowl! It’s THAT good!
There are a couple of different kinds of lemon tart – a firmer, baked version and one that’s a little bit more rustic where the curd is looser, though still “cuttable” and that’s what I’ve gone for here. While the recipe might seem a little long, rest assured that nothing about it is difficult – the pastry can also be made in a food processor which makes things even easier – and the great thing is that each step can be done relatively quickly so all that’s required on the day of serving is assembly! What could be easier?
I’ve chosen to make individual and mini tartelettes here but you could also use the recipe to make one full-sized (10-inch/ 25 cm tart). Anyway you make it, this is a recipe you’ll want to make again and again!
Mini tartelettes au citron
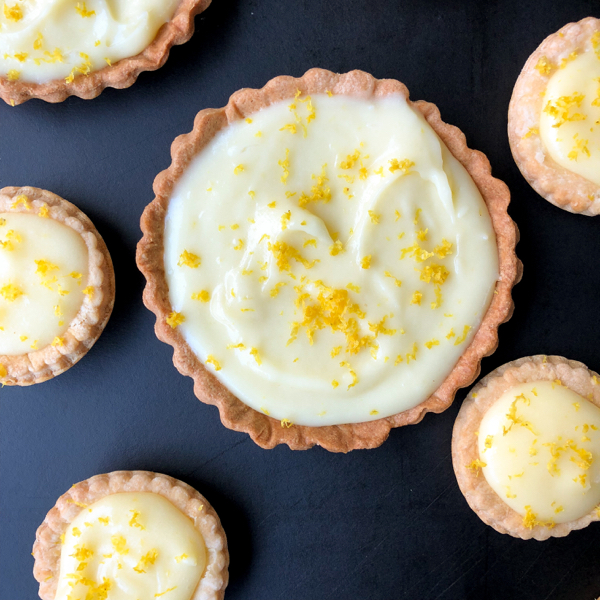
Easy mini tartelettes au citron.
Ingredients
- 1 x recipe easy lemon curd
- 225 g (1 1/2 cups) all-purpose flour
- 1/4 teaspoon salt
- 50 g (1/4 cup) granulated sugar
- 112 g (8 tablespoons/ 1 stick) cold unsalted butter, cut into small cubes
- 1 large egg, lightly beaten
- 2 tablespoons heavy cream
- For baking:
- 1 large egg, lightly beaten
- lemon zest and powdered sugar, for decorating
Instructions
Make the pastry:
1. Whisk the flour, salt and sugar in a large bowl. Add the cubed butter and, using your fingertips lightly rub the butter into the flour until it resembles large breadcrumbs with some pieces the size of small peas. You can also use a pastry cutter for this job.
2. Make a well in the middle of the flour mix and add the egg. Mix the egg into the flour using a wooden spoon until the egg is completely combined.
3. Add the cream and mix until the dough is firm enough to form a ball when you press the mixture together with your fingers—it might be a little crumbly but form the dough into a disk and wrap it tightly in plastic wrap.
4. Refrigerate for a minimum of an hour or up to 3 days in the fridge. You can also freeze the dough, tightly wrapped in plastic, for up to 3 months. Thaw overnight in the fridge before you roll and bake.
For individual tart shells:
1. Remove the dough from the fridge and let it sit for a few minutes so it’s easier to work with. Divide it into 8 pieces.
2. Roll each piece between two sheets of parchment paper until it’s around 1/2 cm (1/4-inch) thick and about 15 cm in diameter.
3. Carefully peel off the parchment and press the pastry into the pan. If your dough breaks in places you should have enough overhang to patch things up. Make sure to press it into the edges of the pan with your fingertips.
4. Once the pastry is pressed into the pan, use a rolling pin to roll around the edges of the top of the pan to remove any extra pastry at the sides.
5. Continue with each piece of pastry until you have 8 individual tart shells.
6. Refrigerate the pastry shells for 30 minutes.
For mini tart shells:
1. Remove the disk of dough from the fridge and let it sit for a few minutes so it’s easier to work with. Cut the dough in halves.
2. Lightly flour a large sheet of parchment, then place one piece of dough on the parchment. Sprinkle it lightly with flour and place a second sheet of parchment paper on top.
3. Roll the dough between the two sheets of parchment paper to a thickness of 1/6 inch (4 mm).
If the dough is soft, you might need to put it back in the fridge to firm up a little before you cut it.
4. Using a cookie cutter that’s approximately 37 cm (3-inches) in diameter, cut rounds of the dough. A cookie cutter with fluted edges makes for pretty little tartlets but if you don’t have a cookie cutter, you can use a glass or ramekin that’s the same diameter. One disk of the pastry should make 10 rounds. You will need to gather up and re-roll scraps of the pastry to make sure you get 10—and each time you re-roll, you will need a touch of flour to ensure the sticky pastry does not stick to the parchment. You may need to re-refrigerate the dough once it’s been rolled out if it is very soft and sticky.
5. Use an offset spatula to help you remove the pastry rounds from the parchment and gently place them in the muffin tins. You don’t need to press them right down to the bottom, gravity will help them sink to form a little cup. Make sure the pastry rounds are evenly centered in the muffin cups. Place the muffin tin in the fridge while you work with the second piece of dough.
6. Refrigerate the pastry shells for 30 minutes.
Fully bake the pastry shells:
1. Preheat the oven to 375˚F. Remove the pastry shells from the fridge, and prick the bottoms lightly a few times with the tines of a fork.
2. Place a non-stick or lightly greased piece of aluminum foil or parchment paper over the top of the shells, making sure to cover the pastry completely. Cover with baking beans or pie weights.
3. Bake for 25 minutes.
4. Remove the beans/weights and foil/parchment, lightly brush with the beaten egg then bake a further 10 to 15 minutes until the pastry is golden.
5. Remove from oven and cool completely.
Assemble the tarts:
1. Remove the curd from the fridge and whisk to loosen.
2. Spoon the curd into the tart shells, filling nearly to the top.
3. Refrigerate for a couple of hours until the curd has re-set. It won't be super firm but it will be firm enough to cut without it falling out of the shell.
4. Garnish with lemon zest and sprinkle with powdered sugar.
Recommended Products
As an Amazon Associate and member of other affiliate programs, I earn from qualifying purchases.

 Happy (French) Friday!
These are, without doubt, one of my favourite: nice and tart, but smooth and creamy as well.
I miss Queen of Tarts in our neighbourhood from years ago: now Mardi can just make these! 😉