
 UPDATE: THE RECIPE IN THIS POST WAS COMPLETELY UPDATED ON JANUARY 28TH 2019 AFTER MORE EXPERIMENTING (YOU CAN’T STOP ME!). READ MY TRIAL AND ERROR STORY FROM 2015 OR SCROLL ALL THE WAY DOWN FOR AN UPDATED RECIPE THAT WORKS. EVERY TIME!
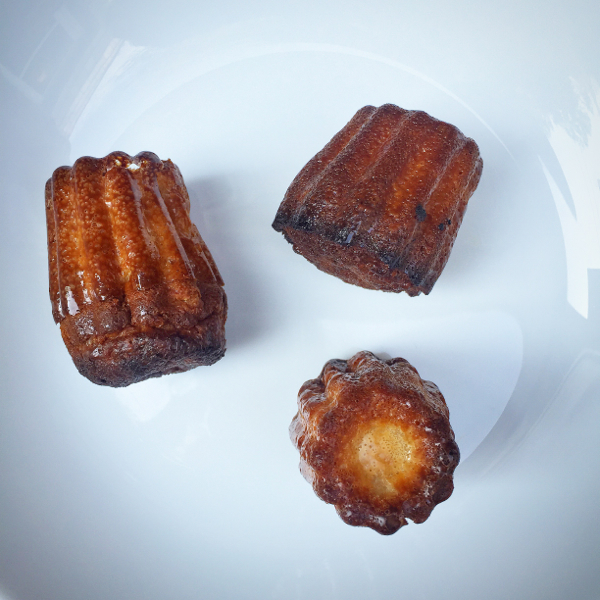
SO, um, canelés. Or should it be cannelés? (Those little cakes with a crunchy caramelized exterior and a custardy interior). No matter how you spell them, I’ve made them before, right? A couple of times… I will also admit to eating a LOT of canelés over the summer of 2014 in France (my favourite ones came from Bernard Meysan in Saint-Emilion) – until last fall, I’ve been meaning to make them for years, ever since I read all Pim’s posts about making canelés (and her success using the silicone molds), as opposed to the copper ones which cost an arm and a leg!). My early attempts were perhaps beginner’s luck… Laughing as I write this post to read that back in October I said:
I’m keen to keep trying these as the recipe is dead easy.
LOL big time. The recipe itself might be “dead easy” (it honestly takes 15 minutes to prepare the batter) but getting the technique right has been a labour of love over the past 4 months. they have become what macarons were to me in 2010. So when Redpath’s Acts of Sweetness team contacted me to ask if I would like to be a part of #projectcannelé, I jumped at the chance. They sent me some silicone molds to try out and it turned out these were the ones I had previously had inconsistent results with so I was even more keen to “get it right”.
Back in the fall when I was first starting to experiment with these, I bought a number of different sized silicone molds to try out (and I had a lengthy email exchange with Dorie and her assistant about which size, which brand etc…) and the ones I liked then were not quite “mini” size – too small and they are simply too small to get a decent custard/ crust ratio and the larger ones are too big (unless they are taking the place of a meal. Ahem.).
Turns out that things change and over what must be 30 half-batches, I’ve discovered there are a number of factors in play which contribute to the success (or otherwise) of cannelés and the molds are a huge part of this, so whilst I really liked the size of the molds I had used last year, they aren’t the ones I’ll be using from now on..
But wait… what’s this about the random different spelling of the name of these treats? Well, according to Paula Wolfert, the little cakes were not so popular until the mid 1980s when :
In 1985, stunned by this surge in popularity, 88 Bordeaux patissiers formed a confrérie, or brotherhood, to protect the integrity of their canelés. They staged a “linguistic coup d’etat” by removing one of the n’s from the old spelling (cannelé) to differentiate their cake, with its secret method of preparation, from bastardized versions. Today, canelé de Bordeaux is the official cake of the city, while cannelé bordelais is a generic name used [around the world].
So, since we’re making these outside Bordeaux, we’ll go with cannelé…
Et hop. On y va with the months-long experiment. I’ve drastically condensed the information in this post to what I consider the bare minimum from what I have learned (lest anyone else tell me “life’s short, move on” as one helpful commenter did on a recent Instagram post… I say, “If you don’t have anything nice to say…..”) but “bon courage” – there’s still a lot to read.
Cannelé trial and error: a summary
For each of these trials (except the very last round) I used Dorie Greenspan’s recipe from Baking Chez Moi which you can find here. As I said, I probably have made over 30 half-batches in the past four months so I’m going to sum up my findings under some distinct categories according to the techniques I used.
1. Silicone molds coated in beeswax and butter.
This is the traditional coating for a cannelé mold and it’s how the little cakes get their rich colour on the outside. Chez Pim, amongst others, offers a lengthy explanation on how to work with beeswax and butter to coat the molds and I happened to get my hands on some food-grade wax from a bee-keeping friend…
I found the wax hard to work with using the silicone molds – it hardens almost immediately it touches the molds and it is NOT fun to remove from your brushes or other kitchen utensils. For me, using these molds with beeswax/butter produced uneven rising and “wonky” looking cannelés. Food-grade beeswax, it turns out, is not so easy to get your hands on so I might not be promoting this method for the average home-baker.
 Wonky, right? To get them the right colour on the outside, I feel like I nearly had to overbake them – the interior was quite dry. They also “fell” quite a bit as they cooled, meaning the custardy interior wasn’t quite right…
2. Silicone molds coated in melted butter.
I feel this method is more like what most people will use. For this batch, I coated the molds in melted butter then froze them for about 30 minutes before baking them in the hot oven. I was fairly happy with the results and should have possibly left well enough alone at that point…
 I wasn’t super happy with the insides of these ones – again, I felt like to get the exterior the colour I wanted, they were *nearly* overbaked on the insides… More cake than custard.

3. Silicone molds – uncoated, coated with beeswax/ butter and coated with melted butter only
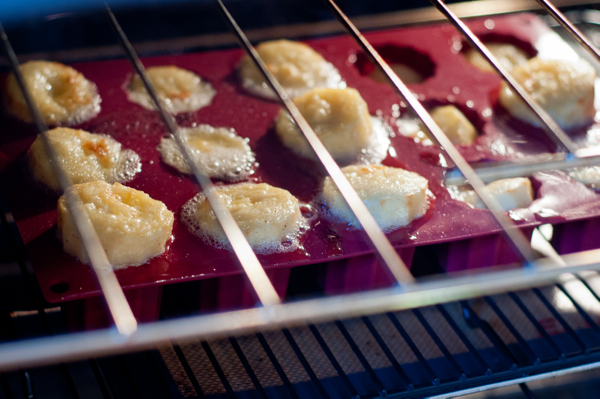
Because I am a glutton for punishment, and because I had read so many places how you DIDN’T need to coat the silicone molds with anything , I decided to do a side-by side experiment in the same tray. I left one row of molds uncoated, coated one row with beeswax and butter (you can see below how hard it is to get a very light coating) and coated one row with melted butter.
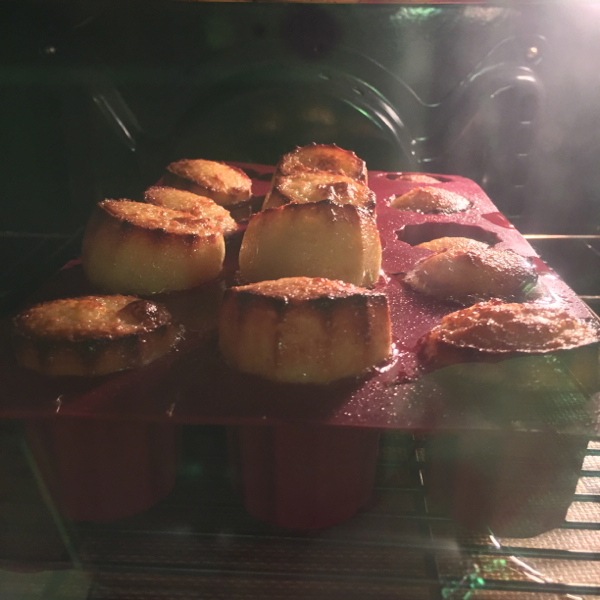
 Watching them in the oven was fascinating (if you are into that sort of thing)… But you can definitely see how differently the molds operate with different (or no) coating.
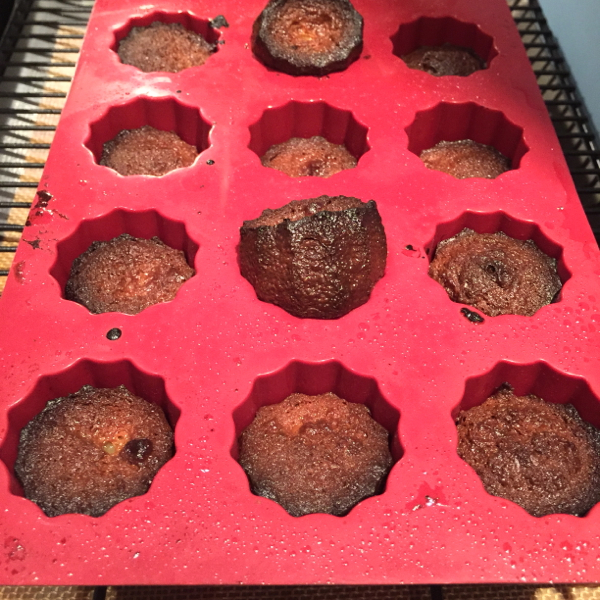 In the end, I decided that the UNCOATED molds were the ones which worked best…
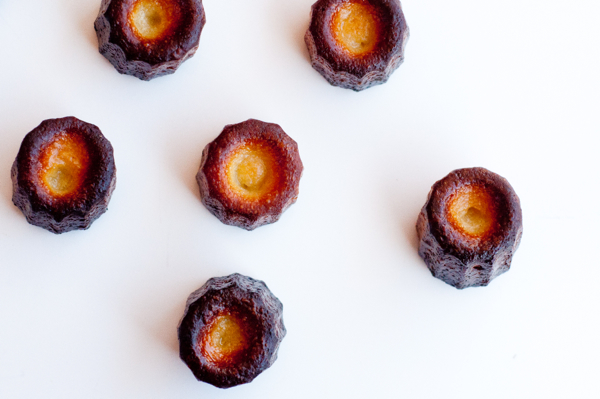
From top: uncoated, coated with melted butter, coated in beeswax/butter:
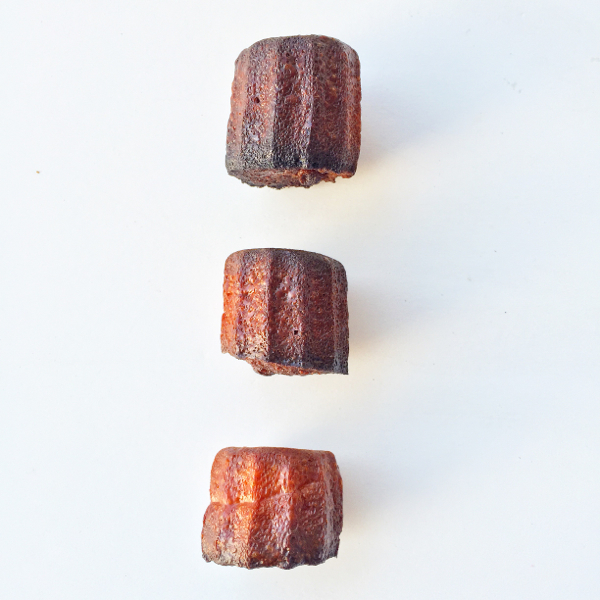 As you can see, the beeswax/butter coated molds behaved oddly this time, producing “creases” in the cannelés. The butter coated molds produced wonky cannelés which didn’t stand up straight while the uncoated molds produced straight, uncreased cannelés.
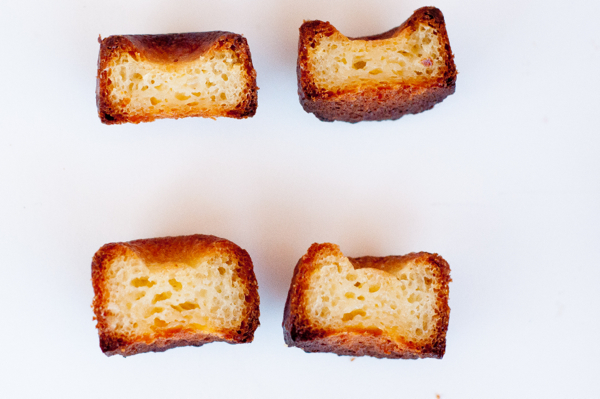
And the interiors?
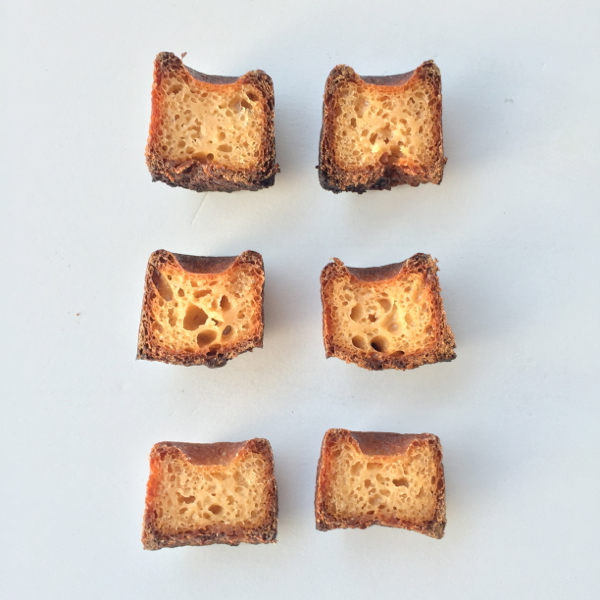 Again, the uncoated molds produced the best interiors (although I feel like these were slightly overbaked and a little dry too…
4. Thicker silicone molds uncoated, coated in melted butter, coated in room temperature butter.
(at this point in my experiments, I took a little break, heading to France for a couple of weeks where I, ahem, ate a lot of cannelés for, you know, research, and bought some gorgeous copper molds to test once I have mastered the silicone…)
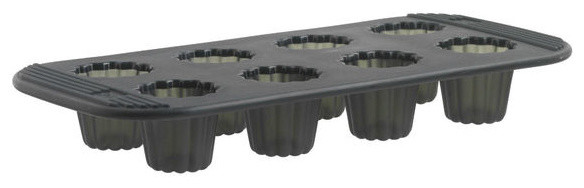
I found myself in Australia unexpectedly at this point in my research and sans my cannelé molds (though I did take them to France… as you do!). I spent a few days hunting down the molds (they mostly go by the name of “Bordelais” in Australia from what I understand and they are NOT easy to find…). In the end I happened across these Mastrad molds which are slightly bigger and a much thicker quality silicone and, since beggars can’t be choosers, I snapped them up. I liked that they have a rigid edge so they are easier to handle:
 This time, I coated the molds in melted butter, room temperature butter (I applied with my fingers a thin coat) and left a few uncoated (as per the instruction on the package). I baked these for 30 minutes at 450˚F and 30 minutes at 400˚F per Dorie’s instructions, however they needed a little extra time to get the colour right on the outside – so they stayed an extra 10 minutes in the oven.
From top: room temperature butter coated molds, melted butter coated molds and uncoated molds:
 You can see that while the room temperature and melted butter coated molds produced gorgeous custardy interiors and straight-sided cannelés, the uncoated molds produced odd humps on the bottoms meaning they don’t stand up straight. So, not a disaster but not ideal either… the thicker molds definitely seemed to produce a much more even heat colouring (but the butter definitely helped there too).
5. Thicker silicone molds uncoated and coated in melted butter using a tweaked recipe.
For my final round of experimenting, I tweaked the recipe a bit. I was really happy with the results of the previous iteration of the cannelés but wanted to try a couple more times to double check that this was, indeed the mold I would recommend. I had just received my friend Jill Colonna’s new book Teatime in Paris and checked out her recipe for cannelés. It’s a bit different from Dorie’s in both quantity of ingredients and the way the dry ingredients are incorporated in the batter (see more on this below) so I tweaked Dorie’s recipe with some of Jill’s suggestions.
Results:
 Again, our uncoated molds produced weird shapes – rising a lot out of the molds and not settling properly meaning they don’t stand up properly. The molds coated in a tiny amount of melted butter fared best. The interiors, however, were prefect:
 I had enough batter leftover for 3 more so I tried again with just melted butter, tweaking the technique I’d been using and the ingredient quantities. Result?
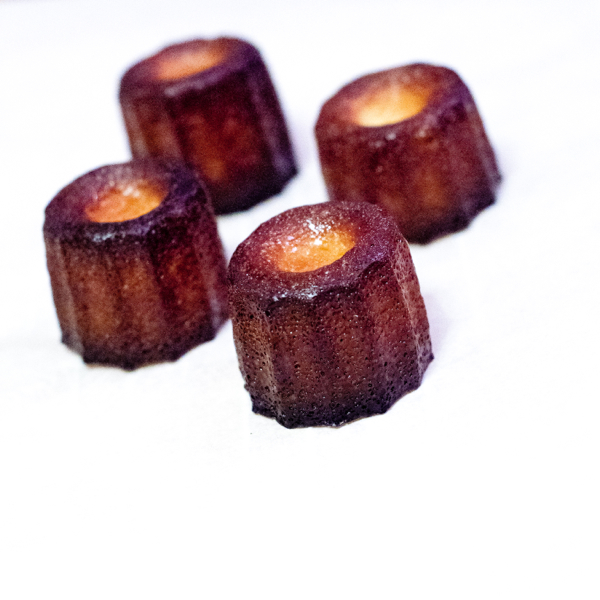
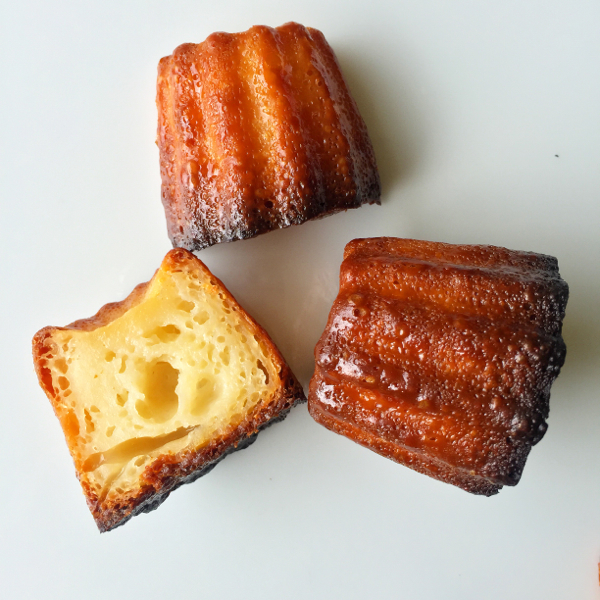
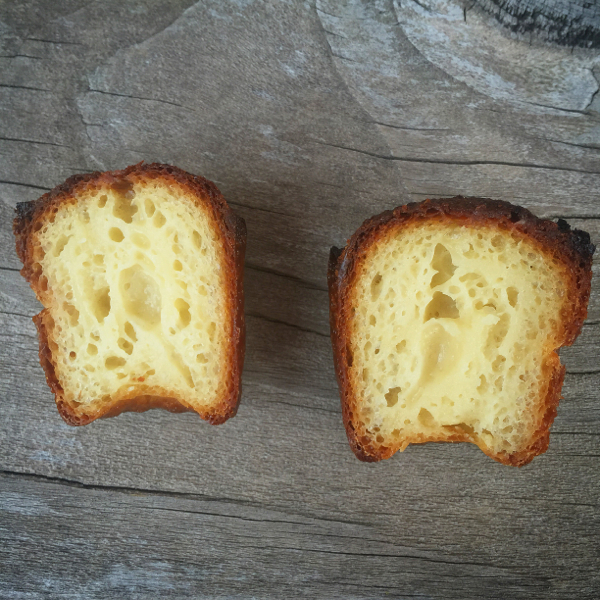
 By jove, I think I have it!
BUT WAIT… (2019 UPDATE ALERT!)
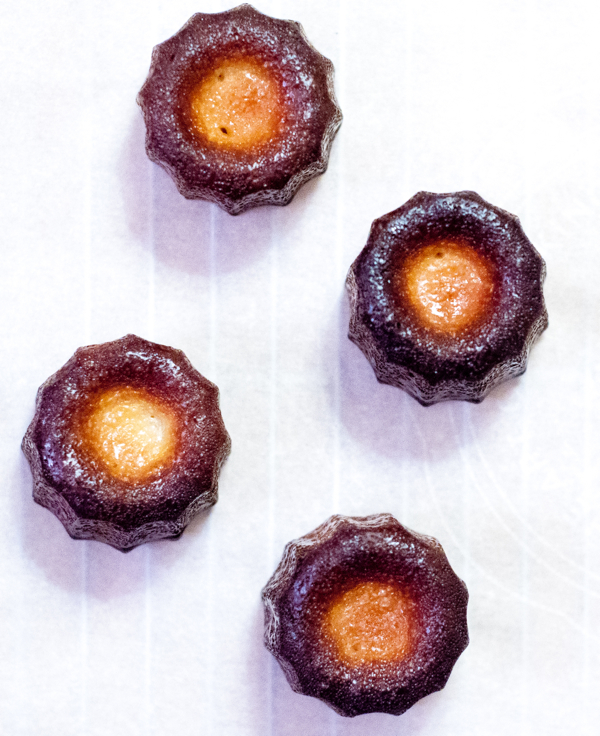
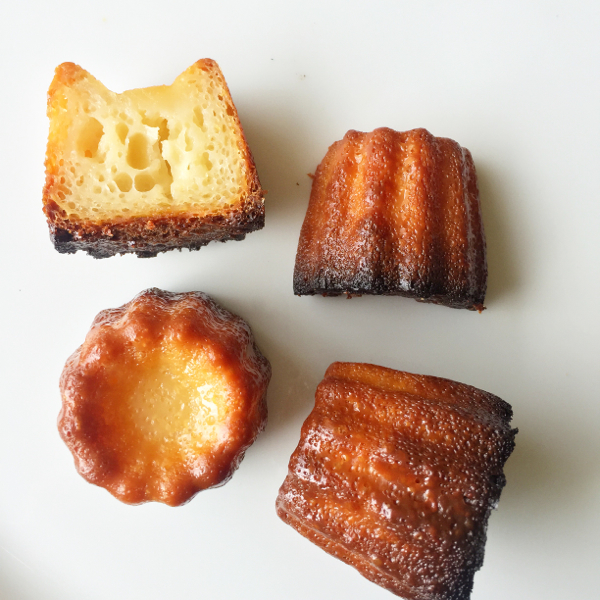
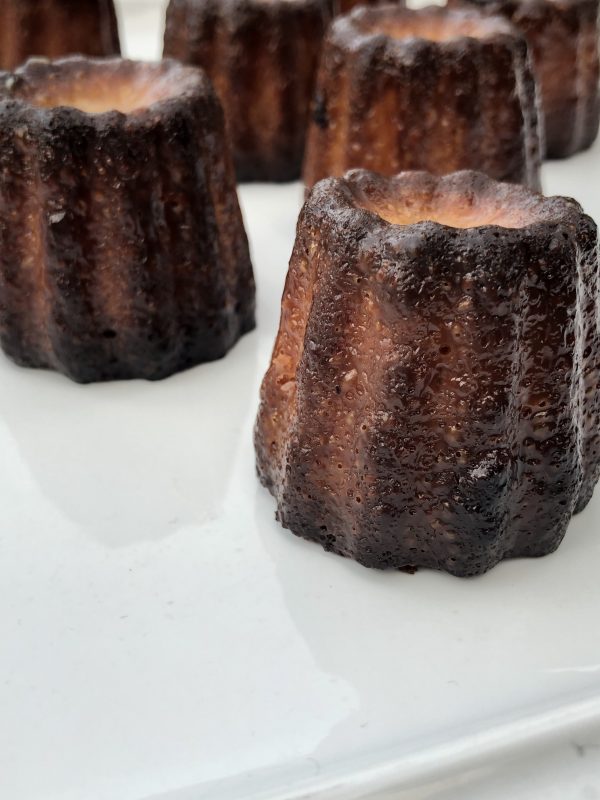
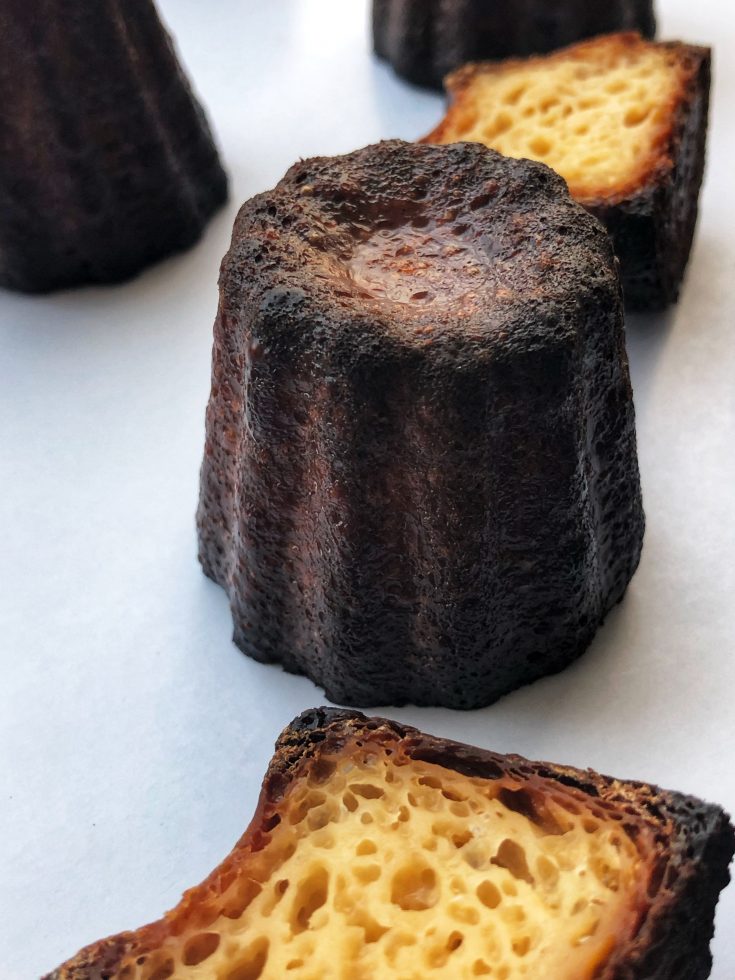
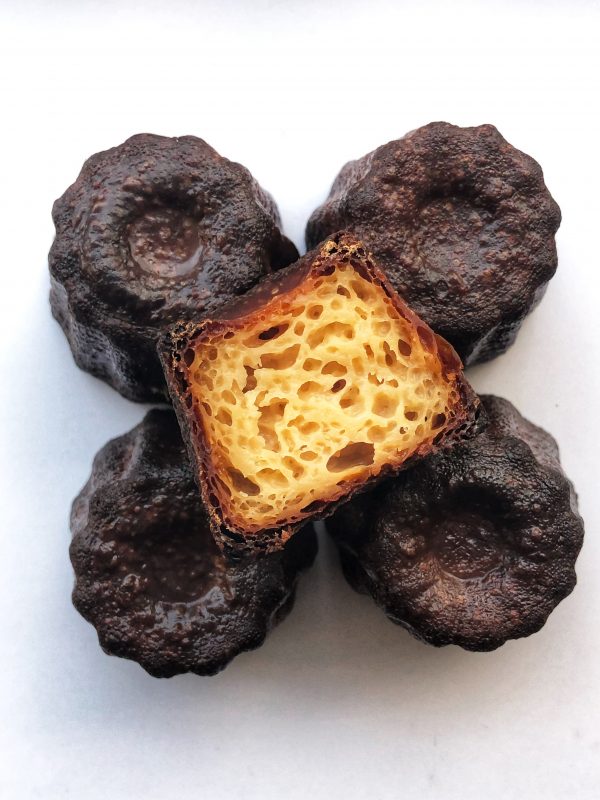
6. The 2019 version of the canelé recipe works every time, produces crispy exteriors and custardy interiors…
Yup. I mean….
10 tips for making canelés/ cannelés in silicone molds (2019 UPDATES included – all taken into account in the recipe below)
1. Air is not your friend. Too much air in the batter will cause them to puff up too much in the oven…….
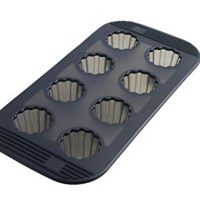
2. Use the best quality silicone molds (read: thicker, not flimsy) that you can afford. The thin ones will get too hot too fast and produce inconsistent results no matter what you do and you’ll find yourself having to say “I don’t know” when people ask you if you can bring 60 of them to their party. Because you get different results every time.
3. Don’t fuss too much over the batter. In fact, treat it like you couldn’t care less if it works out or not and it might just cooperate 😉 My most successful “tweak” in technique was borrowed from Jill Colonna, author of the just-released Teatime in Paris whereby you make a paste from the eggs, egg yolks, sugar and flour and them gently whisk in the hot milk/ butter mix. This seemed to help with a less airy batter – when I tried adding the dry ingredients to the hot liquid I always had to whisk much more which led to more bubbles and air (see #1).
4. Rest your batter at least 12 hours, preferably 24 hours overnight. Gently stir it (with the back of a knife – you don’t want to whisk too much now it’s all settled).
5. Let your batter come to room temperature before you use it in silicone molds. 2019 UPDATE: Feel free to use the batter straight from the fridge.
6. As you are heating the oven, melt some butter and lightly (ever so lightly, mind) brush the molds with the butter. Make sure it doesn’t pool in the bottom of the molds by turning the molds upside down on a cooling rack set over paper towel to drain excess butter out if necessary.
7. Contrary to popular belief, I have had much more success with room temperature molds (another tip from Jill). Maybe they don’t like to be cold then incredibly hot (I mean, I wouldn’t!) like they are if you freeze them (many recipes tell you to use cold molds) before you bake. Room temperature batter 2019 UPDATE: Batter straight from the fridge and room temperature molds produced the best looking (and best interiors) of all the batches – and the most consistent, even shapes…
8. As the cannelé are baking, you might want to keep an eye on them as they might rise slightly over the top of the molds. If need be, take a toothpick and gently coax the shapes down back into the molds but if your batter is the right consistency and your molds are cooperating you might not need to. 2019 UPDATE: I have not had to do this in any of the 8 batches I’ve made in 2019.
9. About 5 minutes before the cannelé are finished baking (maybe 10), pull the tray out and, with the aid of a toothpick, remove the cannelé from their molds and pop them back in the molds right side up. This will help the tops brown a little more (evenly). Be careful – the oven will be hot and so will the molds. 2019 UPDATE: I’ve actually had a lot of success adding 10 minutes onto baking time and removing the cannelé entirely from the molds, popping them upright on the tray and baking until golden all over.
10. Let your cannelé rest in the molds (still right side up) for about 10 minutes before you take them out and place them on a wire cooling rack. 2019 UPDATE: If you’ve removed them from the molds already and baked them for an extra 10 minutes you can just leave them on the tray to cool. They are best eaten at room temperature – I like them after an hour or so. They are best the same day you make them.

I recommend these silicone molds. (2019 UPDATE: These are still the ones!)
Mastrad silicone canelé molds on Amazon
Mastrad silicone canelé molds on Amazon Canada
Buy Mastrad silicone canelé molds on the Amazon store closest to you!
2020 Update! Those Mastrad molds are hard to get hold of… These De Buyer molds are a pretty good substitute
And my recipe? It’s a mish mash of Dorie and Jill’s ingredients, recipe and techniques. With much gratitude to both for answering my constant questions and giving me so much advice… 2019 UPDATE: I’ve kept a lot of these techniques but tweaked the recipe and baking procedure slightly. Seems to work!
How to make cannelés in silicone molds
Cannelés / canelés are mini cakes with crunchy caramely exteriors and custardy interiors. Typically made in expensive copper molds, this recipe uses more accessible silicone with a similar result!
Ingredients
- 2 cups (500 mls) milk (I use 2%)
- 2 tablespoons (27 g/ 1/4 stick) unsalted butter
- 1 cup (200 g) granulated sugar
- 1 cup (150 g) all-purpose flour
- 2 large eggs
- 2 large egg yolks
- 1/4 cup (60 ml) dark rum
- 3 teaspoons pure vanilla extract
- Melted unsalted butter, for the molds
Instructions
One day before baking:
- Bring the milk and the butter to a boil in a medium saucepan. Remove from the heat and cool slightly, stirring occasionally to release some of the heat.
- Place the sugar, flour, eggs and egg yolks in a small bowl and whisk gently until you have a soft paste-like consistency.
- Pour in the milk/ butter and continue to whisk gently until you have a smooth liquid.
- Add the vanilla and rum and give it one last stir (you don't want to whisk air into this batter).
- Use a wire strainer and strain the batter over a glass jug, cover the jug with plastic wrap and refrigerate 12-24 hours.
When you're ready to bake:
- Pre-heat oven to 450˚F.
- Prepare the silicone molds by brushing with a little melted butter. Coat the molds sparingly and if necessary, turn the molds upside down over a wire rack placed over paper towels to drain excess butter from inside molds. Set aside (at room temperature).
- Remove the batter from the fridge, give it a gentle stir and set aside.
- When the oven is at temperature, give the batter one final stir and pour into the molds about ¾ full.
- Place the silicone molds on thin baking tray and bake at 450˚F for 30 minutes.
- Reduce heat to 400˚F and bake for a further 30 minutes.
- After 30 minutes, remove the tray from the oven. Carefully flip the cannelés out of the molds onto a cool, thin baking tray so they are right side up. They should just slide right out of the molds.
- Bake for 10 more minutes.
- Remove tray from oven, place on a wire cooling rack and allow to come to room temperature.
- Best eaten the day they are made (after about 2 hours at room temperature). They can be kept in an airtight container overnight but they will lose some of their crunchy exterior.
Recommended Products
As an Amazon Associate and member of other affiliate programs, I earn from qualifying purchases.


Disclosure: I received a baking kit in 2014 including silicone molds and sugar from Redpath Acts of Sweetness. I was not further compensated for writing this post.
___________
Please note: This post contains affiliate links. I am a participant in the Amazon Services LLC Associates Program, an affiliate advertising program designed to provide a means to earn fees by linking to Amazon.com and affiliated sites. This means that if you click over and purchase something, I will receive a very small percentage of the purchase price (at no extra cost to you). Thank you in advance!
Wow, Mardi! You are a super-trooper and likes are gonna find you around cannelé moulds… shining like the sun. That #projectcannelé was some project and bravo for finding your own method that you like best. I’m very honoured that you mentioned me in the same company as Dorie.
Perhaps you want a break from them just now but next time in Paris, let’s go on a canelé walk 🙂
Thanks Jill! You and Dorie are constant inspirations for me!
There is so, so much practical/useful info here! I want to pin this post a million times and share it everywhere (and I will, slowly but surely!).
I completely agree about the quality of the molds and the thickness of the silicone. And I love that you opted for silicone and not copper (because for us to invest in a set of copper molds would take years, lol!).
I need to read this again, and then buy molds and make cannelés!
Are you bored of them yet?
Not bored of them – and I still have the copper molds to figure out too!
Thank you for all this experimentation and insightful knowledge.
I myself have never made cannelles (on my to do list). However I’m going to jump in here with a
suggestion or two.
Try melting the wax enough to make it more workable, or melt it all the way, cool enough so it won’t
melt the butter and mix together. And then again you might melt both of them, mix, coat moulds,
and stick in freezer to firm up quickly.
Since I am inexperienced in this, I can’t guarantee it will work, but it might be worth some more
experiments.
Have a Joyful Day :~D
Charlie
Thanks for your input. I did. indeed work extensively with the wax and did like you suggested but it is still very hard to work with – the wax hardens pretty immediately on the silicone. And quite frankly, not that easy for most people to get their hands on so it’s why I am recommending the butter route.
Thanks for replying Mardi!
These look like buttery heaven.
I want them NOW!
I have been following your progress with these on your Twitter/Instagram and I am so impressed with your determination and “never give-up” attitude. You have learned a lot and that you took all this time to share your findings in this post is lovely. I doubt I will every try to bake caneles but for those who do, this should be there “go-to” place before they even start to measure out their ingredients and prepare their pans. Congratulations on your success with caneles.
Thanks Paula, it’s been a much more complicated journey than I thought it would be!
Wow – that is a comprehensive analysis of making caneles. You are way more patient than me.
Patient? No. Stubborn? Yes!
Amazing how such a simple, straightforward recipe can be anything but simple OR straightforward, no? I’m still struggling to find the perfect combination, but I think I’m pretty much almost there. Which is good, because my waistline cannot handle any more cannelés at this point! 🙂
Right- and the problem is that they need to be eaten on the same day they are made which makes giving them away problematic!
Mardi and I were at a talk last night with Wylie Dufresne of WD-50 fame (after a screening of the delectable French film Delicatessen), and he spoke of the fun he has experimenting in the kitchen – and how no one should be afraid of making mistakes. All part of the learning, understanding how things work,….
Well, watching the whole cannel sessions, which in and of themselves are reminiscent of watching the macaron sessions circa 2011, reminded me of that.
Baking really is science with a dollop of art, and I’ve been fascinated (if not obsessed) watching it unfold.
However, I would be lying if I did not say I am delighted that I now have a secure source of cannelle, as I do macarons, chez nous. 🙂
Come to think of it, haven’t had any macaron in quite some time…. 😉
Loved reading your adventure with cannelés baking! I was in London recently styling and photographing canelés for a new little French company and ended up eating a whole lot of them. They are such wonderful sweet treats, I have serious cravings for them, I must really get my hands on silicon moulds to satisfy that!
Thanks – I’d love to hear how you get on!
Great post Mardi, I love your blog!
I figured I could add something regarding the use of beeswax. I just recently started using it when I came across it by chance in an organic grocery store.
Alright, so beeswax is a pain as it sets super fast. It will end up exactly like Mardi’s picture. I then remembered there was a canelé recipe In Dominique Ansel’s book (the guy that created the Cronut). He tells us to heat the molds (he uses copper of course) for 15 minutes before using the beeswax and pouring in the batter. It helps to achieve a nice crunchy exterior. I figured it would work for silicone also. It does!
I heat my mold for about 5min before brushing in the beeswax. These molds get so hot that you have ample time to coat them and pour in your mixture before the wax can set. I recommend turning your mold over on some parchment paper as you can easily reuse any wax that dripped on it.
Now the end result is pretty amazing. The beeswax gives the canelés an amazingly shiny and crunchy exterior. I recommend letting the canelés rest in their molds over a wire rack for 30 minutes when using beeswax. In this case I do not use your nice trick of unmolding and remolding towards the end. The exterior needs to set and harden in the mold for a beautiful result.
Hope it works for anyone who tries it.
Great tips! I will definitely try this next time I go with the copper!
Sorry if I didn’t explain it well, I use this trick for the silicon mold. I do not own any copper ones as the price tag is prohibitive.
Wonderful work.Thank you. I do have a question: do you sugar coat the molds after you butter?
How do they get the slightly crunchy exterior?
They get crunchy from the heat, I don’t coat with sugar.
Hi Mardi,
Thanks for your wonderful post on caneles. I have been trying to perfect them too. My current issue is that they keep “poofing” up beyond the molds and eventually flopping over. I’ve tried lowering the temperature, and also tried opening the door to cool them down when they puff too much. But so far neither has worked – either it still happens, or if I cool them, they overall don’t cook properly. Do you happen to have any tips?
Thanks,
Jason
Have you tried filling the molds with less batter?
What a superb tutorial Mardi
I have been wanting to make these for ages and I have just got the thick silicone mould and this is definitely on my baking list. Have you tried doing different flavours in them or chocolate coating them? is this the done thing?!! Or am I being a heathen
I’ve only ever made the plain ones, sorry!
I still like paula-wolfert’s recipe best after testing many. She claims it is the original, with egg yolks only. The mixture cooks to a thin custard before you put it in the fridge for 24-48 hours. I have found a white oil mixture of mostly vegetable oil with a little bit of bees wax melted in it is best. Brush the silicone moulds but then tip them upside down to drain. There should be very little oil left on the moulds. Fill the molds almost full. They rise a bit but the mixture has no air in it so it rises only a little. The result is a very silky custard with no air bubbles on the inside and a very crunchy outside. I too experimented for months and this is as good as it gets, very easy. Use bake without any fan too. Silicone moulds are fine.
Thanks for all of this info. As you can see I did a fair bit of experimenting myself as well. I have not tried Wolfert’s recipe but am intrigued. Though authentic canelés do have air bubbles in the inside…
I just tried these at home and ended up burning the tops a tad, so second round I took it easier and paid more attention and they came out great! I love the dark rum flavor (not sure if that is standard for these or not as it’s also my first time making them).
Yes the rum is a standard addition 🙂 Glad you enjoyed and keep practising – as you can see, it was a lot of trial and error for me to get these right!
What a handy post, both the recipe and the anecdotal reader comments. I have been meaning to try these and feel like I have a good starting point!
Thanks – I hope it might be helpful 🙂
Hi Mardi,
Do you have to include rum in this recipe? Is there something else I could substitute it for?
Thanks!
Feel free to leave the rum out or use artificial extract…
Thanks for replying so quickly – I’m going to try them now! Have read lots of recipes online but yours definitely seems the most tried and tested!!
I just made 8 in the silicone molds alongside 4 in nonstick molds. The ones in the nonstick molds popped right out but the silicone molds would not release the canneles. I did use butter method then freezing them before baking. Do you think that was the problem or I just didn’t let them cool in the molds long enough before flipping them?
With the silicone it sometimes helps to turn them upside down immediately they come out of the oven…
Hi Mardi,
I tried making these today, but they ended up being a little dense in the middle. They didn’t have a lot of air pockets, and I’m hoping you have some recommendations for me? Yours look amazing!!
Thanks!’
There are so many variables (as you can see from the MONTHS of testing I did for this post) – what molds are you using?
My wife fell in love with canneles in Lyon 2 1/2 years ago. Last year she bought me a silicone mold for Christmas, but I was so intimidated by the mountain of lore that I never got around to it. Now thanks to the currently-raging #bombogenesis blizzard, I’m finally attempting this recipe!
Oooh – let me know how you get on!
I made two batches at two different times:
1) For the first batch, I filled every cup in the mold and followed these instructions pretty much to the letter, except for the bit about popping them upside down for the last 10 minutes. The corner canneles were just about perfect, but soft on the inner corners. The canneles from the inner cups were soft and yellow and hard to remove from the cups (so I could not turn them upside down). The flavor was great. I saved the remaining batter for a second attempt, but the mold needed extra cleaning because the canneles had not unmolded easily.
2) For the second attempt, I filled every other cup in the mold so I got 8 instead of 15. I also left them in an extra 5 minutes of so to be sure. I shouldn’t have – these came out easily and were brown all around, but were a bit overdone.
—-
I plan to try twice or three times more (one batch of this batter will make about 24 canneles in my mold) using the every-other cup method and shorter cooking time.
So far this recipe looks like just what I need, and my wife is very happy!
This is wonderful to hear John, thanks for checking back in 🙂
The next attempt met with greater success. I put the batter in every other cup for better heat transfer. I did 450 degrees for the first half hour, and then 20 minutes at 400. My wife thought they were a little hard on the outside, but after a few hours in a ziplock bag they were perfect.
I plan to try again twice – once at 400 degrees for 50 minutes, and again at 450 for 30 and then 15 at 400.
But for now she is ready to declare victory!
Thanks for these updates – it sounds like you might be just as obsessed as I was/ am 😉 Keep us posted!
I tried again, but this time I did not put a cookie sheet under the silicone mold and they scorched on the bottom. The flavor is still good, but the temperature and time needs more practice!
can you give the recipe amounts not be grams? I’m not sure how to convert to American measuring system. thanks!
500mls whole milk – 2 cups
30g unsalted butter = approx 2 tablespoons
250g granulated sugar = 1 1/4 cups
140g all-purpose flour – just under a cup
I highly recommend you buy a scale though, especially for baking.
also, since I purchased the thinner red silicone pan (only one available here from sur la table) do I coat it with butter, or leave it uncoated. thanks!
Hi again, yes, the uncoated molds were the ones that worked the best for the red silicone -as per my notes 🙂
thank you for your prompt reply! can’t wait to try it. my favorite treat on my trip to Bordeaux last spring
They came out awesome! Thanks for your help!
Can I just ask about the granulated sugar? It’s this your regular sugar rather than caster/baking sugar? Ta!
Yes this is regular sugar 🙂
Did you ever try the expensive copper moulds? They are so expensive, but wondering whether they make life easier.
I did experiment with them but never wrote it up. The molds are so expensive (I bought mine in France where they were NOT expensive but for most people they are..) and I also found my results were a bit inconsistent there too..
I have a set of 6 that I bought in Bordeaux and they give me brilliant results. The silicon moulds not so… the ones in the middle don’t seem to cook properly but the ones on the edges do. I’m seriously considering buying some more copper ones.
I know the copper molds work but for most people they are not practical to buy…
Thank you so much for this! I have tried your 2019 edition and the flavour, outside crust, and interior custard is spot on. I’m using a silicone mould and I’m having trouble keeping them stay up (they collapse when I flip them over) for the final 10 minute bake. Any tips?
Hmmm.. If the crust is spot on I’m not sure how they are collapsing? Which mold are you using (it definitely plays a role!). And if that’s the case, just leave them in the molds for the last 10 minutes! Let me know how you get on!
I have the silicone moulds you mention and am going to try this. Also have beeswax, so here we go!!
Do let me know how you get on!
Thanks for the recipe and your chronicles of how you got there. I followed your instructions to a T, cept maybe 20degC lower each step of the way and they turned out perfectly. Crunchy on the outside, and custardy squidgy inside – utter heaven!
Oh this makes me SO happy! Sounds like you know your oven! Bravo! Enjoy!
I learnt to Bake Caneles fromYoutube videos and I baked my first batch this morning. Then I encountered some problems eg, the batter terribly rose up, although after baking for about 1 hour, most of them shrunk back in. Then I tried to figure out what was happening then and made few assumptions. Then I googled and came across this article, which help answering all my question completely.
Thank you for sharing all the techniques and the recipe. I’ll try again with my left over batter from this morning with your techniques and I’ll definitely try your recipe some other times.
Thanks for commenting! Do let me know how you get on!
Hi Mardi! I have questions about the pan you recommend. It says it is good to 220F, which in the comments i found is a typo. Even converted, that is only 428F. Your recipe has you starting at 450F. Do you find that your molds can handle the heat? And, sadly, they are not avaialbe to ship to my location – in Wisconsin USA. Do you have a second choice thick silicone pan?
Hi, if you are unable to purchase this particular mold, I’m not sure what to suggest. And yes, the pan handles 450˚F.
I would try these: https://www.amazon.com/Buyer-Professional-Silicone-Miniature-1977-01/dp/B001CFI162/ref=sr_1_22?crid=TZZDGY86A86Q&dchild=1&keywords=canele+molds&qid=1586282723&sprefix=canele%2Caps%2C160&sr=8-22
I’m excited to try making these after reading your blog. I went through a similar process myself when i was trying to figure out macarons. I’m glad you already went through the hard labor and I might just have to tweak it slightly for my oven and the fact that I live in over 5000ft elevation. Silicone molds are on the way! Have you tried the copper molds? I don’t think i’ve seen a post.
I have tried them a few times but since they are not accessible ($$$) for many people, I haven’t written about my experience!
I live at 5030 ft above sea level in Colorado. After several trials using Mardi’s recipes and tips the caneles were passable but not at all comparable to those we discovered in a small patisserie in Metz near the cathedral. We tweaked Mardi’s recipe as follows: batter remained the same as hers i.e. 2 C mill, 2 T butter, 1C sugar, 1 C AP flour, 2 eggs whole + 2 yolks, 0.25 C dark rum, 1 T vanilla extract; mixed, strained, stored in fridge overnight. Next day filled 3/4 of each cavity red silicone canele molds from Oggibox. Baked at 430 F on thin metal tray for 30 minutes reversing the tray after 15 minutes then lowered oven temp to 400 F and baked for 20 minutes more. Removed from oven, everted mold onto cool thin metal tray. The caneles ( slipped out of mold easily even though mold was not buttered. The tray with the unmolded caneles then baked an additional 10 minutes in the 400 F oven followed by cooling on a wire rack. Color and caramelization was perfect as was the crunchy texture of the outsides of the caneles. Interior was baked but not dry and overbaked but was moist and custard like and retained the rum flavor. One can play with the added 10 minutes of baking the unmolded canels at 400 to achieve a desired level of custardy-ness. Tweaked recipe works every time at 5030 feet above sea level! BTW the molds came with a frame that was supposed to be able to handle a 450 F oven, a temp called for in Mardi’s recipe. The frame became badly distorted at that temp. Moreover at that temp the caneles were way to dark and bitter tasting. The 430 F oven eliminates these issues.
Thanks for the tips on baking at altitude. Obviously I can’t advise on this as I don’t but this is very helpful! (which molds did you use?)
I’ve just started experimenting with caneles too. The ones I make in the lovely copper moulds I bought in Bordeaux come out fine. The ones I make in the silicon moulds do not. Yesterday I found that the ones in the central holes simply didn’t cook, while the ones on the edges were fine. Any suggestions? It’s also a mould that is deeply unstable once filled so I have to put it on the thin baking tray before I fill it, unless I want to be mopping up canele batter from every surface!
Hi Stella, As you can tell from my post, I experimented with many different types of molds before I figured out it needs to be a thicker silicone to work properly. Sounds like you are working with a flimsy one that doesn’t conduct heat very evenly…
I made the 2019 version last night after batter rested for 43 hours in fridge. Used the De buyer 6 mold pan w elastimold ? $39.00 on Amazon.
They looked amazing when done, beautiful crispy brown Crust all around, but when I cut into them after 2 hours the insides were a bit gummy like an under baked croissant? They had more horizontal layers, more than small holes expected. Thought maybe they were not baked enough and later put them back in 400 oven for 10 mins. This did not help. They were extremely moist inside, but in my opinion too chewy. My batter did not have any air bubbles before I baked them. While baking they rose up a lit but fell back down after out of oven. Looked as though they were going to be perfect on first try! Guess that was a long shot!
I don’t know how they couldn’t have been baked all the way , after baking at 450 from 30 mins, then at 400 for 30 mins, then addition 10 mins when it unmolded them. As I said, I later baked them again for 10 mins after that. My oven temp is accurate, as I have two additional oven thermometers to test it. They seem to have too much gluten maybe? The only thing I did differently from recipe was to place plastic wrap directly in top of the batter and then another piece on top of the bowl. Could this make any difference? Wish I could send pictures but I don’t know how. The pan worked beautifully and I was surprised what a beautiful hard crust they had without the use of copper molds.
I only baked 6 last night and plan on baking the other 6 today. Do you have any suggestions
for me? Thanks much,
Suzanne
Hi, you can always contact me through the Contact me” page on this site to send photos. I am quite shocked that they would not be cooked after all that time but hey, it took me MONTHS of making them to get them right so…. Try not putting the plastic wrap touching the batter?
Hi Mardi,
I have followed your recipe to the letter and had great success on the whole. The only thing is that I have different sized silicone moulds ranging from tiny to huge, and I don’t know how to adjust the timings accordingly. Measuring at the widest point in cm, my moulds are:
Large 5.2 W 4.7 D
Medium 4.7 W 3.6 D
Small 3.3 W 2.6 D
Please can you let me know what adjustments to timings you would suggest, and what sized moulds you use for your recipe? Many thanks!!!
Hi, the molds I use are linked in the post 😉 They are 5cm in diameter (wide), 5.5cm (ish) high and 5cm across (deep). I’d use your “large” molds for my recipe. Hope that helps!
I did it! I tried your recipe and technique but used Celine’s method on greasing the moulds (I have the same) and it worked! I just turned them out into a baking sheet afterwards, and put it back to the oven to give it a little more color. Thank you!
That’s great! (not sure who Céline is but I’d love to know her method for greasing the molds!)
What can I substitute the rum with?
You can just leave it out.
I used Chefmade silicone coated steel molds and your recipe with a little more butter. I lightly greased them with liquid butter and started at 475 for 15 minutes, then 375 for a little less than 30 minutes. Then I turned them out onto a rack and put them back in the oven for maybe 10 minutes until burnished brown and crisp on the outside. They were perfect! The inside was just how it should have been.
I’m glad your modifications worked!
Hi Mardi, thank you for sharing your story. Very entertaining. I tried your recipe for the first time, I was a bit worried that my newly purchased Fat Daddio’s silicone mold is a bit thinner than the ones you used. My oven temperature is off, so it wasn’t rising evenly. I had two pans. I didn’t want to open the oven door and lose the heat but decided to risk it and switched them around. Glad I did as it baked beautifully as the rest of your recipe described. I overfilled the molds, slightly more than 3/4 as recommended and only 3 turned out wonky, slanted to one side. They were beautifully carmelized and smelled divine. Waiting for them to cool before eating them! Will definitely be making more of these beauties!
Oh thank you so much for this feedback – I am glad you took the risk and that it paid off! I hope they taste as good as they sound like the do!
Hi Mardi thank you for directing me to this post after you saw my Instagram post. I am keen to try another batch soon with the extra information from your 2019 update.
Especially the tip to finish on a tray for 10 minutes.
Excellent! Let me know how you get on!
I used the exact recipe but I used a stainless steel 12 canele mold. I did not use beeswax but melted clarified butter brushed on pan. Cooked these at 500 for about 15 minutes and then 375 for 40 or so minutes and this is the result. They are perfect! I wish I could leave a photo.
Thank you so much for letting me know! glad the recipe worked out for you!
I can’t wait to make these, but have a question first! In France the “all-purpose” flour is a bit closer to the US “cake” flour and I live in the US. What all-purpose flour do you use?
I live in Canada so the flour I use is probably similar to yours!In France I think the flour I use is T45. Does that help?
Yes, thank you! Now one more question- I am in France and have access to the Mastrad molds. How many cannellés will this recipe make?
It’s right there in the recipe – “yields 20” 🙂
Thank you for your obsessional detail.
Mastrad 42414 not available that I could find in California. Amazon Canada won’t ship here. De Buyer is available.
What are your thoughts on carbon steel individual molds? They resemble the copper.
Convection or regular bake mode?
Thanks in advance for your response.
I do not have experience with the individual carbon steel molds, sorry! I’d always use convection though for more even heat.